AI编程多简单?让娃体验一把程序员的魔法棒
AI“一波流”10分钟开发挥手琴Web App
AI“一波流”10分钟开发挥手琴Web App
周末在家,想给小朋友做个小游戏玩玩,正好也是个机会,可以记录一下用 AI 辅助编程(Vibe coding)完成一个项目的过程是多么简单。
如果你也对这种方式感兴趣,但还没尝试过,希望我的这次经历能给你一点启发。
📺 视频版:AI编程多简单?让娃体验一把程序员的魔法棒
参考我的视频演示
一个简单的想法
我想做一个“虚拟乐器”。对着电脑摄像头,用手指在空中“弹奏”:
- 手指上下移动,改变音高。
- 手指左右移动,控制音量。
- 手指斜向移动,就同时改变音高和音量。
想法很简单,也很有趣。
先规划,后编码:我的 AI 协作流程
在真正开始写代码之前,我没有直接动手,而是先让 AI 帮我做规划。这个准备步骤,我觉得是整个过程能如此顺利的关键。
- 把需求丢给 AI:我先把“虚拟乐器”的想法完整地描述给一个大型语言模型(比如 Gemini)。
- 生成项目概览:它帮我生成了一份项目概览,总结了核心功能、推荐了技术栈(比如用
Google Mediapipe做手部识别,用tone.js合成声音),并把整个项目拆解成了几个可以执行的小模块。 - 保存为计划文档:我把这份计划存成一个 Markdown 文件,放在项目根目录里。
这份计划文档就像一张地图,能让后面的编码过程非常清晰。
一步步实现
接下来,我让编码助手(我用的是 Claude Code)参考着这份计划,开始一步步写代码。我每次只让它专注于实现计划中的一小步。
- 第一步:基础界面设置。 先搭好一个简单的网页框架。
- 第二步:调用摄像头。 让网页可以访问并显示摄像头画面。
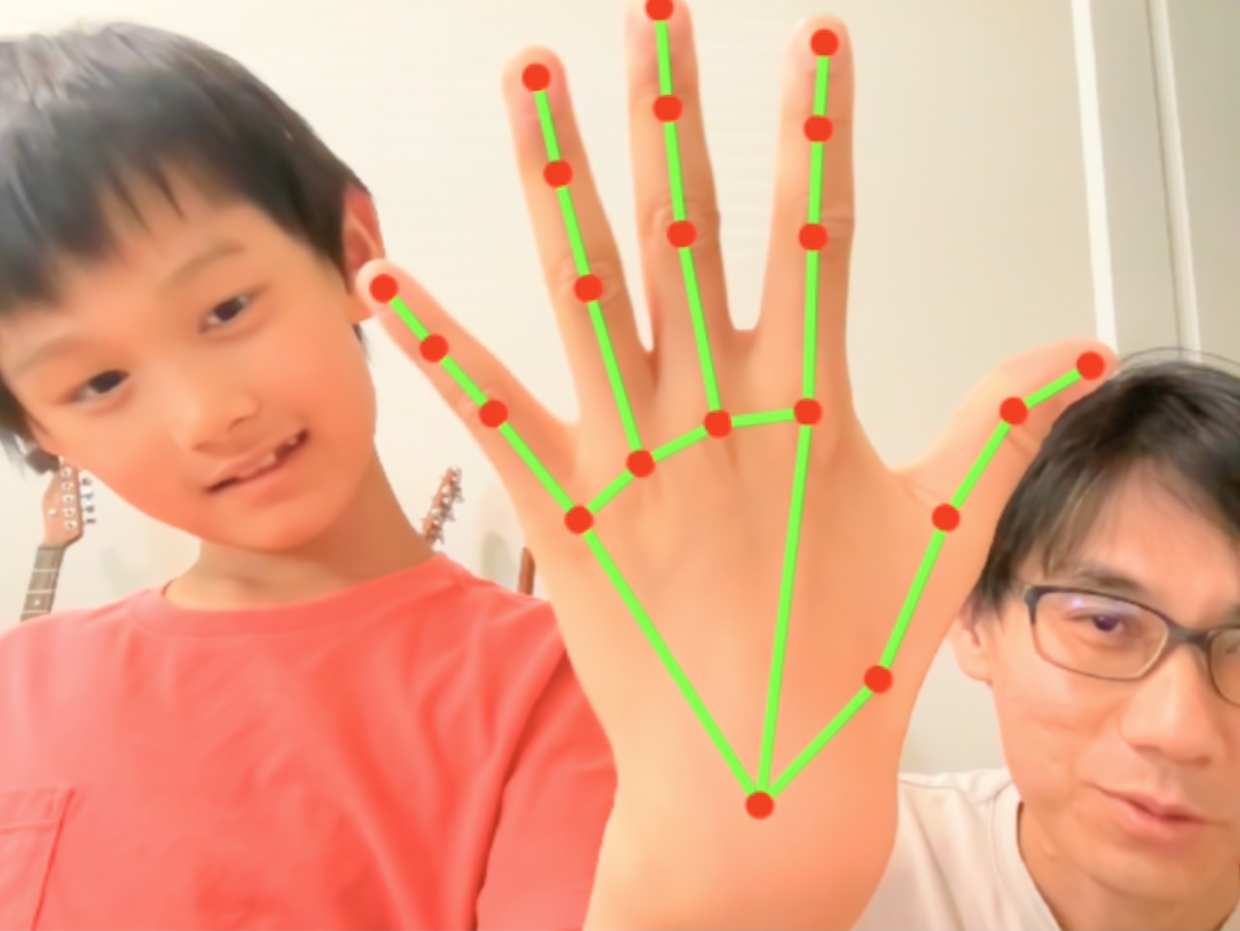
- 第三步:手部识别。 集成 Google Mediapipe,让程序能识别出画面中的手指标记点。到这一步,看到屏幕上自己的手被实时追踪,感觉已经很酷了。
- 第四步:集成声音合成。 引入
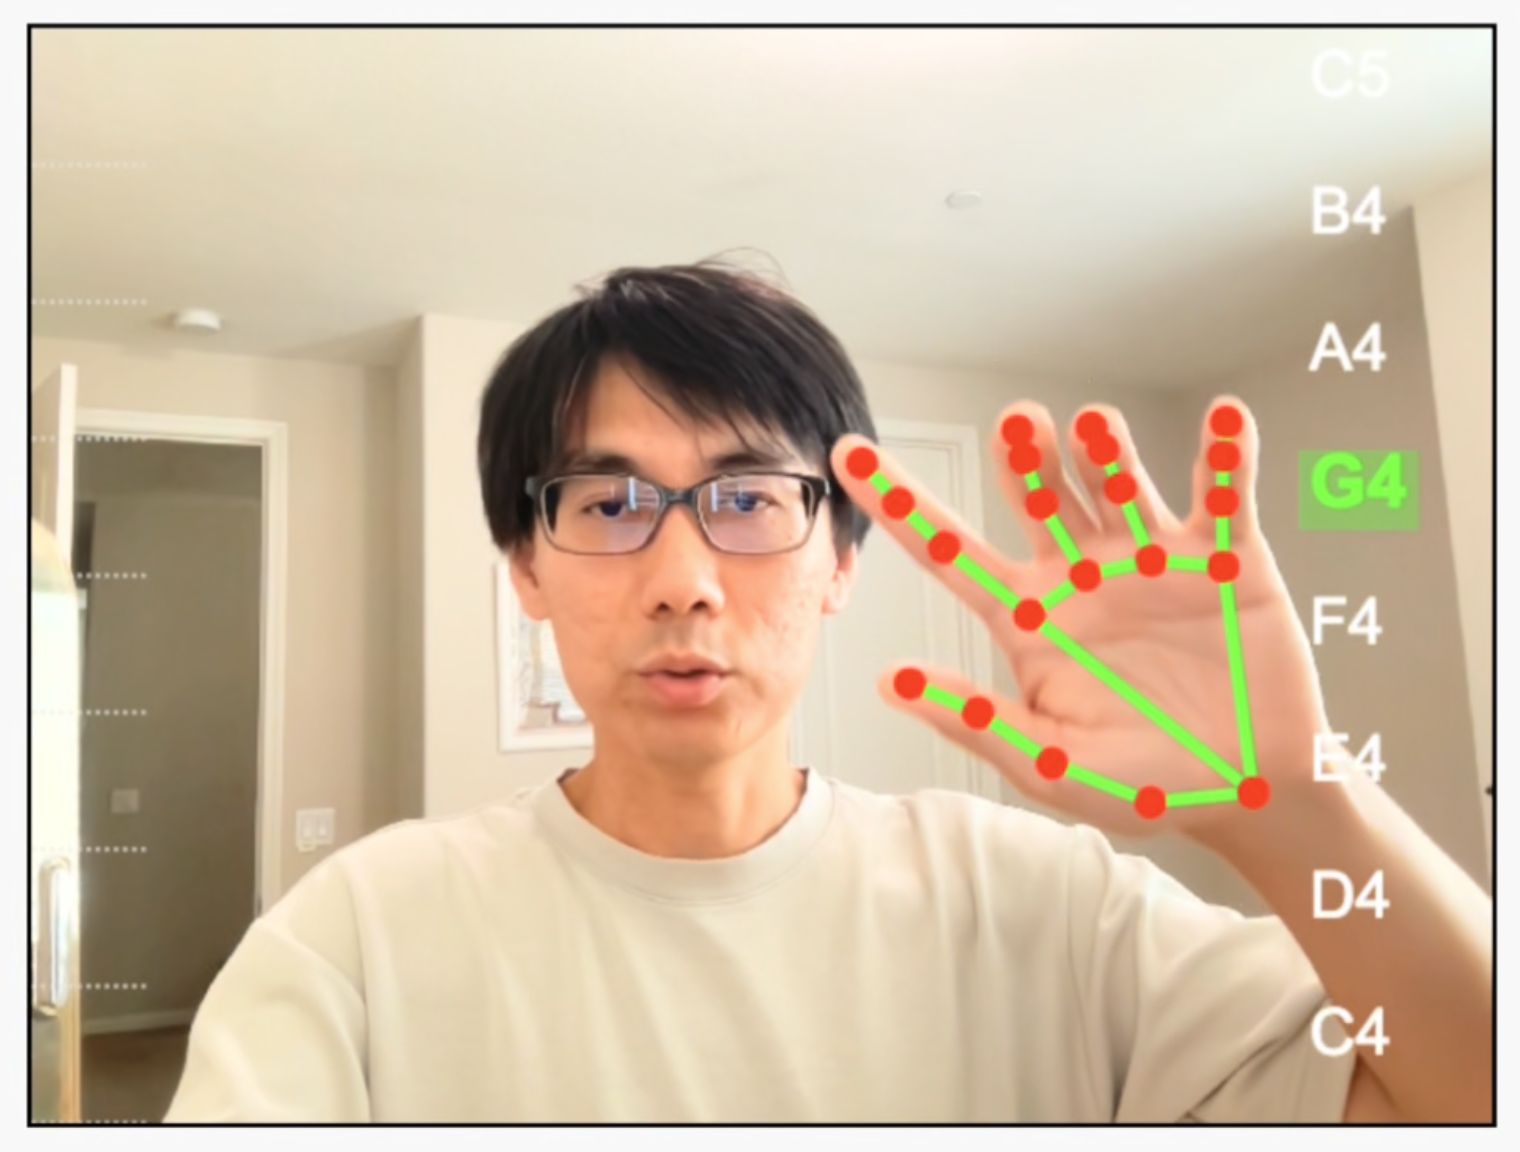
tone.js库。我先让 AI 生成了几个测试按钮,确保点击能发出声音。 - 第五步:连接手势与声音。 这是最核心的一步,将手部坐标映射到音高和音量上。
- 第六步:添加视觉辅助。 在画面上增加一个简单的音阶显示,这样就能直观地看到当前“弹”出的是哪个音符了。
每完成一步,我都会在浏览器里测试一下,确认功能正常后,就进行一次 git commit。这样即使后面 AI 出错了,回滚起来也很方便。
一些感想
回过头看,这个项目本身并不复杂,或许直接让 AI 从头开始写也能完成。
但先让 Gemini 帮忙分析需求、规划模块,保证了整个项目的架构非常清晰。这让后面负责编码的 Claude Code 实现起来效率更高,也更少犯错。
事实上,这次从头到尾,Claude Code 没有生成一个 bug,整个过程一气呵成,体验非常顺畅。
虽然项目还有很多可以完善的地方,但作为周末的一个小作品,已经足够有趣了。
项目代码:https://github.com/rokabytedev/theremin_hand
我给Gemini的提示词:
I want to achieve the following functionality, and I’ll describe it to you. Then, you need to help me break down how to achieve this function into a specific implementation plan. This should include an overview of the project, a step-by-step breakdown of the modules needed and the priority order of implementation. The technologies involved and how to implement them should also be included. I’ll then give this plan to an AI coding agent to help implement this function.
The function I want to achieve is a web-based application that uses image recognition to identify the five fingers of my hand. It will use one of the fingers as a pointer-like feature for a virtual instrument. The higher my finger is on the screen, the higher the pitch of the sound that is played. Conversely, the lower my finger is, the lower and deeper the sound. The screen should display a scale like C, D, E, F, G, A, B, representing different natural notes. When my finger reaches the corresponding height, it should roughly play the pitch of that note. This is to be implemented on a webpage. So, first, analyze which technology stack can achieve this, and then write a step-by-step implementation plan.
Gemini 2.5 Pro生成的项目计划书:
Project Overview: The “Theremin Hand” Web Application
The goal is to create a web-based musical instrument that uses a webcam to track the user’s hand. The vertical position of the index finger will control the pitch of a synthesized sound, effectively turning the user’s hand into a controller for a virtual theremin. The interface will display the video feed with hand landmarks overlaid, along with a visual musical scale to guide the user.
Core Functionality:
- Webcam Access: Capture a live video stream from the user’s camera.
- Hand Detection: Use a real-time hand-tracking model to identify the position of the hand and its finger landmarks in the video feed.
- Pointer Tracking: Isolate the landmark for the tip of the index finger and track its vertical (Y-axis) position.
- Audio Synthesis: Generate a musical tone that can be turned on and off, with its pitch controlled dynamically.
- Pitch Mapping: Map the finger’s vertical position on the screen to a specific musical note from a predefined scale.
- Visual Feedback: Display the webcam feed, the detected hand landmarks, and a visual representation of the musical scale (e.g., C, D, E, F, G, A, B). The currently playing note should be highlighted.
Recommended Technology Stack
This project can be built entirely with front-end web technologies, requiring no backend server.
- Core Language: JavaScript (ES6+) for all application logic.
- Markup & Styling: HTML5 and CSS3 for the structure and presentation of the webpage.
- Hand Tracking: Google’s MediaPipe Hands. It’s a high-fidelity, pre-trained machine learning model that runs efficiently in the browser via TensorFlow.js. It provides detailed 21-point landmarks for each hand, which is perfect for identifying fingertips.
- Audio Synthesis: Tone.js. This is a powerful JavaScript library built on the Web Audio API. It simplifies the process of creating synthesizers and playing musical notes, making the code much cleaner than using the native Web Audio API directly.
- Drawing & Visualization: HTML5 Canvas API. We will use a
<canvas>element to draw the video frames, overlay the hand landmarks provided by MediaPipe, and display the musical scale UI.
Modular Breakdown
The application can be broken down into five key modules (which will be implemented within a single script.js file for simplicity, but organized logically).
UI_Module(HTML/CSS): The basic page layout. This includes the canvas, a hidden video element, and a “Start” button.Camera_Module: Responsible for requesting access to the user’s webcam and streaming the video feed.HandTracking_Module(MediaPipe): Initializes the MediaPipe Hands model, processes video frames, and provides the landmark data.Audio_Module(Tone.js): Initializes the synthesizer, and contains functions to start, stop, and change the pitch of the sound.MainController_Module: The core logic that orchestrates everything. It takes landmark data from theHandTracking_Module, maps it to a note, and sends commands to theAudio_Module. It also controls the drawing on the canvas.
Step-by-Step Implementation Plan (Priority Order)
This plan is structured to build the application incrementally, ensuring each part works before moving to the next.
Priority 1: Basic HTML/CSS Structure and Project Setup
Goal: Create the basic webpage and include the necessary libraries.
- Create
index.html:-
Set up a basic HTML5 document.
-
Include a
<title>: “Theremin Hand”. -
In the
<body>:- A
<h1>title. - A
<button id="startButton">Start</button>to initialize the application (crucial for browser audio policies). - A
<div>to act as a container. - A
<video id="webcam" style="display: none;"></video>element. It will be hidden but is required to stream video to MediaPipe. - A
<canvas id="outputCanvas" width="640" height="480"></canvas>element. This is where everything will be displayed.
- A
-
Include the required libraries via CDN at the end of the
<body>:<script src="https://cdn.jsdelivr.net/npm/@mediapipe/hands/hands.js" crossorigin="anonymous"></script> <script src="https://cdn.jsdelivr.net/npm/@mediapipe/camera_utils/camera_utils.js" crossorigin="anonymous"></script> <script src="https://cdn.jsdelivr.net/npm/@mediapipe/drawing_utils/drawing_utils.js" crossorigin="anonymous"></script> <script src="https://cdnjs.cloudflare.com/ajax/libs/tone/14.7.77/Tone.min.js"></script> <script src="script.js"></script>
-
- Create
style.css:- Add basic centering for the content.
- Style the canvas with a border (
border: 2px solid black;).
- Create
script.js:- Leave it empty for now.
Priority 2: Webcam and Canvas Integration
Goal: Get the user’s webcam feed and display it on the canvas.
-
In
script.js, get references to the DOM elements:const videoElement = document.getElementById('webcam'); const canvasElement = document.getElementById('outputCanvas'); const canvasCtx = canvasElement.getContext('2d'); const startButton = document.getElementById('startButton'); -
Initialize the webcam: Use the
Camerautility from MediaPipe, which simplifies the process. This will be wrapped in the “Start” button’s event listener.// This will be called later when we integrate hand tracking. // For now, it just draws the video frame. function onFrame() { canvasCtx.clearRect(0, 0, canvasElement.width, canvasElement.height); canvasCtx.drawImage(videoElement, 0, 0, canvasElement.width, canvasElement.height); requestAnimationFrame(onFrame); } startButton.addEventListener('click', () => { const camera = new Camera(videoElement, { onFrame: async () => { // We'll add MediaPipe processing here in the next step. // For now, we'll just draw the frame manually to test. }, width: 640, height: 480 }); camera.start(); // Start the manual drawing loop for testing. // This will be replaced by the MediaPipe onResults callback. onFrame(); });Self-Correction: A manual
requestAnimationFrameloop is good for testing, but MediaPipe’sCamerautility provides its ownonFramecallback. We should structure the code to use that. The next step will refine this.
Priority 3: Hand Tracking Integration
Goal: Detect the hand and draw the landmarks on the canvas over the video feed.
-
In
script.js, initialize MediaPipe Hands:const hands = new Hands({ locateFile: (file) => `https://cdn.jsdelivr.net/npm/@mediapipe/hands/${file}` }); hands.setOptions({ maxNumHands: 1, modelComplexity: 1, minDetectionConfidence: 0.5, minTrackingConfidence: 0.5 }); -
Define the
onResultscallback function: This function is triggered every time MediaPipe processes a frame and has results.function onResults(results) { canvasCtx.save(); canvasCtx.clearRect(0, 0, canvasElement.width, canvasElement.height); // Flip the canvas horizontally for a "mirror" view. canvasCtx.scale(-1, 1); canvasCtx.translate(-canvasElement.width, 0); // Draw the video frame. canvasCtx.drawImage(results.image, 0, 0, canvasElement.width, canvasElement.height); // If hand landmarks are detected, draw them. if (results.multiHandLandmarks) { for (const landmarks of results.multiHandLandmarks) { drawConnectors(canvasCtx, landmarks, HAND_CONNECTIONS, {color: '#00FF00', lineWidth: 5}); drawLandmarks(canvasCtx, landmarks, {color: '#FF0000', lineWidth: 2}); } } // We will add audio logic here later. canvasCtx.restore(); } hands.onResults(onResults); -
Connect MediaPipe to the camera inside the
startButtonlistener:startButton.addEventListener('click', () => { // Hide the button after starting startButton.style.display = 'none'; const camera = new Camera(videoElement, { onFrame: async () => { await hands.send({image: videoElement}); }, width: 640, height: 480 }); camera.start(); });
At this point, running the application should show a mirrored webcam feed with green lines and red dots tracking your hand.
Priority 4: Audio Synthesis Setup
Goal: Create a synthesizer and make it play a test note.
-
In
script.js, create a synthesizer and state variables:// At the top of the file let synth; let soundEnabled = false; let lastPlayedNote = null; -
Initialize Tone.js and the synthesizer inside the
startButtonlistener: This is critical because audio cannot start without user interaction.startButton.addEventListener('click', async () => { // ... (camera setup code from previous step) ... // Initialize Audio await Tone.start(); synth = new Tone.Synth({ oscillator: { type: 'sine' }, envelope: { attack: 0.1, decay: 0.2, sustain: 0.5, release: 0.5 } }).toDestination(); soundEnabled = true; console.log('Audio context started and synth created.'); });
Priority 5: Connecting Hand Position to Pitch (The Core Logic)
Goal: Use the index finger’s Y-position to control the pitch of the synthesizer.
-
Define the musical scale: Add this to the top of
script.js. We reverse it because Y=0 is the top of the screen (highest pitch).const noteScale = ['C5', 'B4', 'A4', 'G4', 'F4', 'E4', 'D4', 'C4']; -
Update the
onResultsfunction: This is where we will add the main logic.function onResults(results) { // ... (drawing code from Priority 3) ... if (soundEnabled) { if (results.multiHandLandmarks && results.multiHandLandmarks.length > 0) { // Landmark 8 is the tip of the index finger. const indexFingerTip = results.multiHandLandmarks[0][8]; const yPos = indexFingerTip.y; // This is a normalized value from 0.0 (top) to 1.0 (bottom) // Map the Y-position to a note in our scale. const noteIndex = Math.min(Math.floor(yPos * noteScale.length), noteScale.length - 1); const currentNote = noteScale[noteIndex]; // Play the note, but only if it's different from the last one. if (currentNote && currentNote !== lastPlayedNote) { synth.triggerAttack(currentNote); lastPlayedNote = currentNote; } } else { // If no hand is detected, release the note. if (lastPlayedNote !== null) { synth.triggerRelease(); lastPlayedNote = null; } } } // ... (canvasCtx.restore()) ... }
Priority 6: Adding the Visual Scale UI
Goal: Draw the musical scale on the canvas and highlight the currently playing note.
-
Modify the
onResultsfunction again: Add drawing logic for the scale after drawing the hand.function onResults(results) { // ... (drawing code for video and hand) ... // ... (audio logic code) ... // Draw the musical scale UI canvasCtx.restore(); // Restore before drawing UI so it's not mirrored. noteScale.forEach((note, index) => { const y = (index + 0.5) * (canvasElement.height / noteScale.length); canvasCtx.font = "24px Arial"; // Highlight the currently playing note if (note === lastPlayedNote) { canvasCtx.fillStyle = 'green'; canvasCtx.font = "bold 28px Arial"; } else { canvasCtx.fillStyle = 'white'; } canvasCtx.fillText(note, 20, y); }); // The original canvasCtx.restore() is now here, but we should call it // before drawing UI, so we remove the duplicate. }Self-Correction: The canvas state needs careful management. The drawing order should be: 1. Flip canvas. 2. Draw mirrored video/hand. 3. Restore canvas to normal. 4. Draw UI elements. The code above has been corrected to reflect this.
This complete, step-by-step plan provides a logical path to building the application. It starts with the basics, ensures the core technology (hand tracking) works, then integrates the output (audio), and finally adds the user-friendly UI enhancements. An AI coding agent should be able to follow these instructions to generate the final code.